popsicle stick dolls

2 Comments »

So, I noticed that I haven’t posted a project since-well-Easter. Hmmm, what can I throw out there that would be helpful during these long hot summer afternoons. (Since swimming isn’t an art project.) These little dolls are a project from my book that are great for filling an afternoon with industrious fun. It kept my little “test group” busy for almost 4 hours. 🙂
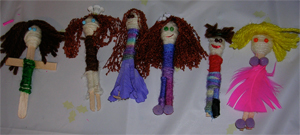
dolls

Materials:Morgan’s doll with a bed

Popsicle sticks

Yarn (for hair and clothes)

Beads (for eyes)

Small pompoms

Small flowers

(Basically anything in your art box you want to throw out there.)

Scissors

Glue (We used Aleene’s, but Elmer’s would work, it’s just very slow drying. Hot glue is the best option, it just presents other safety issues.)

Directions:

1. Cut about half way up the center of a popsicle stick. (This is a little tricky; it was fine for my 7 year old nieces, but younger kids would need help.) Gently pull the two halves apart a little.

2. Cut an 8 inch piece of skin colored yarn for the head. Glue one end of the yarn to the stick and wrap it several times around the stick so that it makes a head shape. Tuck the end in or glue.

3. Glue on beads for eyes (you could also cut little bits of yarn and glue them on.)

4. To make the hair, wrap yarn several times around your hand (or something else that is about 2xs as long as you want the hair to be.)Weston’s crazy doll

5. Slip off and loosely tie a piece of yarn around the middle of the coiled yarn (hair) and glue to the head. (You may need to hold it down for a bit while it dries.) Cut through the loops at the bottom and trim up as desired.

6. Wrap the body in the color you want for the shirt. (Do this the same as the head, only wrap around once or twice.) When you get to the legs, go completely down one, tie off or glue then start at the top of the other. (You will want to secure the beginning with a bead of glue like you did for the head.)

7. Now embellish: I cut the edge of a sequin to make the mouth, you could also use yarn. We used pompoms for feet and for the body of one dress (the rest of which is a pink feather) and the small flowers were also very popular.

You can make them life-like or, like Weston, you can get a little crazy with it! The kids liked this so much that they quickly progressed to making beds for the dolls, then cell phones, the a couple of just funny designs. They loved this and it can easily fill up an afternoon or more.

Happy Birthday Picasso!

No Comments »

picasso1.jpgWell, it is Picasso’s 125th birthday and he certainly deserves a little celebration. He is widely acknowledged as the most influential artist of the 20th century. I am an avid fan …not necessarily because I love all of Picasso’s work-I actually don’t-but because all of it incites an emotional response. Pieces like “Petite Fluers” evokes a sunny, childlike smile. “Guernica” (probably my favorite) is heart-wrenching and epic. However, when I see a reproduction of Les Demoiselles d’Avignon” I feel uncomfortable, even a little revolted. I am sure Mr. Picasso would have been delighted to hear it! Good or bad, it is a strong response that most artists are driving for.

I think it is amazing to see how varied and prolific Picasso was. His father was an artist and teacher and saw his potential at a young age. He went through several periods that are distinct and unique and is credited for starting the Cubist movement. Which was had a huge impact on modern art. You can read an in-depth biography and see works from each period at Artchive. Another great site which will link you other sites where you can view Picasso’s works is Artcyclopedia as well as Artsy.

When I was teaching art classes, I combined learning about art history with practicing actual technique. At first, I was unsure as to whether the kids would like it or find it boring. I was quickly surprised to see that they loved it and clamored for information about influential artists. I would love to share some of the activities we did. Let me know if you like this and want more. Here is a project that you can do with your kids to experiment with Picasso’s style:

Make your own Cubist Paintings

Materials:

White paper

Cardstock or construction paper

Scissors

Crayons or other mediapicasso2.jpg

For inspiration take a look at House in a Garden and Portrait of Maya with a Doll and Three Musicians.
1. Set up a still life by arranging a few items from around the house on your kitchen table. Anything will work: fruit, dishes, bottles of various things, look for a bunch of different shapes. Or you can draw a few pictures of yourselves or eachother.

Tips:

Use a variety of colors, make one realistic and one crazy and wild. (Try blue hair, green skin, purple eyes.)

Do your pictures from different angles. For example, draw one sitting in front and one to the side.

Use whatever medium your child likes, crayons work great for this because they produce such bold colors.

2. Draw at least 2 pictures of your subject.

3. Cut the pictures up. You can cut it into different shapes, or cut out individual items or features (eyes, legs, flowers, etc.)picasso3.jpg

4. Arrange the peices of your pictures on a piece of cardstock. Try a few different configurations.

5. Glue down the final choices. You might get a few pictures from your pieces; you could diplay them together as a series.picasso4.jpg

« go back