44 lessons, one artist or art movement at a time.
Artist
Leonardo da Vinci's life and the Mona Lisa's sfumato shading lead into a project where you sketch and label your own invention, thinking like him.
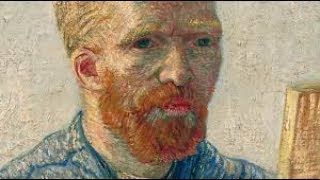
Vincent van Gogh's life and struggles, then paint alla prima in his style with thick, side-by-side strokes of harmonizing and contrasting color.
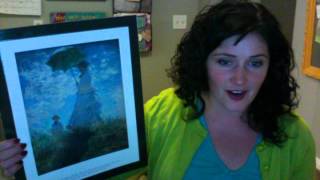
Explore Claude Monet and the Impressionist movement, then paint a loose landscape using bold impasto strokes and dabs of color to capture fleeting light.
Students explore Frida Kahlo's symbolic self-portraits, then paint their own from a mirror to capture both their likeness and inner feelings.
Meet Dutch Golden Age genre painter Johannes Vermeer and his light-filled scenes, then paint your own simple everyday scene with acrylics on tag board.
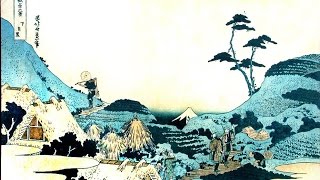
Japanese ukiyo-e master Katsushika Hokusai's life and woodblock prints, then carve your initial or a simple design into soft cork to make an inked stamp.
Andy Warhol's rise from shoe ads to Pop art silkscreens, then make six colorful variations on one image and mount them into your own Warhol-style piece.
Georgia O'Keeffe's life and American Modernist flower paintings, then kids make their own close-up O'Keeffian flowers with layered, blended oil pastels.
Explore Austrian painter Gustav Klimt's gilded, patterned style, then add metallic foil to a watercolor painting of your own design.
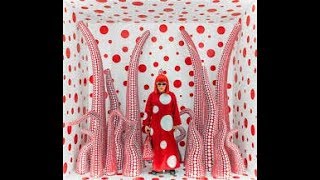
Yayoi Kusama's polka-dots, pumpkins, and infinity rooms inspire a mixed-media collage made with card stock, pastels, fabric scraps, and embellishments.
Henri Matisse's life and cut-out collage technique, then make your own design by cutting and tearing colored paper and gluing the pieces into place.
Edvard Munch, Expressionist painter of The Scream; students make a pastel landscape or portrait that conveys inner emotion through bold color and line.
Project
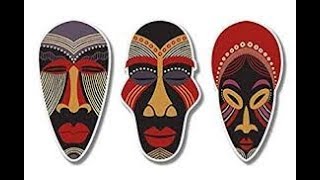
African tribal masks carry spiritual meaning and animal symbolism and shaped Cubism; students carve their own air-dry clay passport mask.
Meet Alexander Calder, inventor of the mobile, then build your own balanced mobiles and stabiles from pipe cleaners, fun foam, and beads.
Self-taught folk painter Grandma Moses (Anna Mary Moses) and her busy country scenes inspire a colored-pencil drawing of a favorite family activity or holiday.
Art movement
The Art Nouveau movement and its organic, nature-inspired designs, with a project where students sketch everyday objects redesigned to be more beautiful.
Berthe Morisot's life as an Impressionist painter, plus a mixed-media project layering pastels and textured impasto paint into a loose, quick everyday scene.
Meet early-Renaissance painter Sandro Botticelli and his round tondo paintings, then create your own pastel tondo framed by a plate's rim.
Caravaggio's chiaroscuro lighting and turbulent life set up a chalk-pastel project where you light a dramatic scene to lead the viewer's eye.
Artists
Romantic painters John Constable and JMW Turner and their vivid new way of painting nature; students paint sweeping landscapes in pastel and watercolor.
Dmitri Prigov, a leader of Soviet unofficial art, used poetry and newspaper installations to defy censorship; students make their own shaped books.
Students explore Edward Hopper's soft realism—clean lines, dramatic light, lonely urban scenes—then paint a meaningful place on a canvas board.
Faith Ringgold pioneered painted story quilts; students make their own fabric-scrap quilts, adding crayon detail and text to tell a personal story.
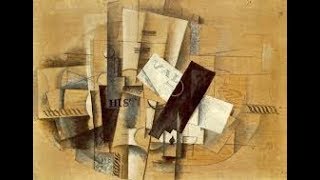
Meet Georges Braque and the birth of Cubism with Picasso, then paint a still life from multiple viewpoints on canvas and add torn-paper collage.
Georges Seurat and his Pointillism technique, where students dab tiny dots of pure color onto canvas boards to create their own optical-mixing painting.
Helen Frankenthaler and the Color Field movement she pioneered, with a watercolor project deconstructing a favorite place into abstract fields of color.
James Audubon's lifelike Birds of America watercolors inspire children to paint natural scenes and keep a pocket field book for sketching wildlife outside.
Jean-Michel Basquiat's short, influential career and a mixed-media graffiti project: sketch, color with markers, then layer pastels for bold highlights.
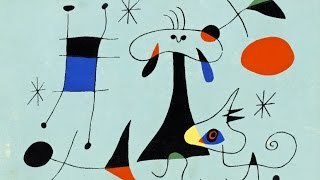
Joan Miro's life, Surrealist style, and grattage technique, plus a mixed-media project turning a random squiggle into a marker-and-watercolor painting.
Lorenzo Ghiberti cast the Baptistery's bronze Gates of Paradise in Renaissance Florence; trace and emboss your own raised foil relief inspired by his doors.
Lou Hirshman built caricatures of public figures from found objects; make your own Constructions by arranging and gluing everyday items onto foam.
Sculptor Louise Nevelson turned found wood and scraps into monochrome assemblage art; kids build their own assemblage boxes from charms, pasta, and card stock.
Mark Rothko's life and color-field paintings inspire a taped watercolor project where kids blend multiform color fields with wet-on-wet, salt, and lifting.
Spanish painter Miquel Barcelo inspires textured, sculptural paintings built on canvas board with joint compound, yarn, and fabric.
Trace mosaics from Mesopotamian and Roman floors through sparkling Byzantine glass walls, then glue your own ungrouted tesserae onto a board.
Meet Njideka Akunyili Crosby, Nigerian-American painter of layered collage scenes, then make your own mixed-media scene of an everyday moment from your life.
Profiles illustrator Norman Rockwell and his Saturday Evening Post covers, then students draw their own detailed crayon scenes that tell a story.
Paolo Uccello, the Late Gothic painter who pioneered perspective, anchors a project drawing a multi-figure story scene with a vanishing point and chalk.
Paul Cézanne, the Post-Impressionist who simplified nature into cylinders, spheres, and cones, paired with a still-life painting on canvas board project.
Flemish painter Peter Paul Rubens and his luminous portraits, plus a partner-portrait project drawn in chalk on dark paper to capture that inner glow.
Roy Lichtenstein and the Pop Art movement, then draw your own comic-style story panels outlined in sharpie and shaded with Ben-Day dots.
Salvador Dali's life and the symbolism of his surrealist paintings lead into a watercolor project where you paint your own dream-inspired scene.
Meet Masaccio, the early Renaissance painter who pioneered perspective, then draw a profile portrait step by step and finish it in chalk.
Wassily Kandinsky, a father of abstract art, inspires a crayon-and-watercolor resist painting that turns music and feelings into line and color.