december’s artist: tomasso masaccio

No Comments »

Tomasso Masaccio was born December 21, 1401 in a small town north of Florence, Italy. There is very little information documenting his life, but it was common for artists to become apprentices around age 12. Most likely, he went to work under a master in Florence around that time. His first documented work (which was signed by him) was completed in January 1422. Artists during the renaissance did not sign their work until they had achieved the status of master. Twenty-one was young to be a master and sadly Masaccio died when he was 26. During this short career though, he had a profound influence on art. He was one of the leaders that moved the style of painting from very ornate and unrealistic two-dimensional to a more natural and realistic view. He was one of the first to use linear perspective (with lines moving back to a vanishing point) as well as atmospheric perspective (where things get bluer, blurrier, and lighter as they recede into the background) in his painting. He used shading and directional light sources as well as shadows beneath objects to create much more life-like figures than the traditional use of outlines and flat, two-dimensional depictions. His work had a heavy influence on later artists, such as Michelangelo.

Masaccio created primarily religious works to ornament cathedrals, but he also painted a handful of portraits. He had a preference for showing people in profile. Today we will create our own portraits in profile. You can work with a partner and draw each other or use the hand mirrors to draw a self-portrait (Which will be more difficult, you will need to peak out of the corner of your eye to do so.)

This lesson will guide you through the general way to draw a face. Remind the students that each face is unique. It is by observing and drawing the unique features that we make our drawings life-like. This will be a bit technical, so help the students not to get too stressed out over the details.

1. Very lightly, draw a line the length you want your finished face to be. Lightly draw intersecting lines to divide this into thirds. This will give you a fame-work to keep the face in proportion.

2. Look closely at the shape of the nose then draw it in the center section, all the way from the top to the bottom.

3. In the top section, we will draw the forehead. Indent in a little where the nose meets the forehead and then bow out for the ridge of the brow bone. Now gently curve up to the top of the line to make the forehead.

4. Make a small mark 1/3 of the way down in the bottom section, this will be the mouth. Look at how the area connecting the lip and nose curves in. Make this and then curve out for the lip. The upper lip will end in the line. That is the opening of the mouth. Now make the bottom lip, indent in and slope back to make the chin. Then extend a line below the jaw down to make the neck.

5. The eyebrow will start at the top line. For now, make the general outline, but don’t worry about putting in a lot of detail. Look carefully at where the eye falls under the eyebrow. The bottom of the eye will be at about the center of the section. If you lay a pencil down at the corner of the nose the end of the eyebrow, the corner of the eye will fall along this line also.

6. Now erase the guide lines. Add in the interesting details. Make the eyebrows with several short strokes that will look like hair. Add in a few clumps of eye lashes around the eyes, frame the face with hair. For older students, you can talk a little about shading, if you’d like. Add some rich details like Masaccio would, a fancy necklace or hat. Put your subject in intricately detailed clothes, anything that makes it fun.

7. Finally, add a little bit of color by filling in the areas with chalk. Press lightly and use small strokes, then blend gently with your finger. Spray each picture with hairspray, holding the can 6” away to “fix” the chalk and pencil. This will keep them from smudging.

november’s artist: henri matisse

No Comments »

Biography:
Henri-Émile-Benoît Matisse was born on December 31, 1869 in northern France. His father was a successful grain merchant. Matisse went to law school and practiced briefly. When he was 20, he had appendicitis and his mother brought him a set of paints to keep him busy while he was recovering. He said that he discovered “a kind of paradise” during those days and abandoned law to study art. This was a bitter disappointment to his father, but Henri moved to Paris where he studied painting in the traditional style. In the next decade, he became friends with a then unknown VanGogh and started to follow the work of Cezanne and Gauguin. He quickly became a leader in the new styles of art. In 1898, he married Amélie Noellie Parayre and had 2 sons, he also had a daughter. Amelie and his daughter modeled for several of his works.
Around 1906, he was introduced to Pablo Picasso and the two became lifelong friends and rivals. Together, they are credited with defining modern art. During this time, he traveled to Morocco, Spain, Algiers, and Tangiers, ultimately settling in Nice. In 1939, he and Amalie divorced. Another of his common models, a Russian named Lydia Delectorskaya became his companion and worked with him, running the studio, keeping records and correspondence for the rest of his life. Matisse stayed in Paris and was able to work through WWI.
In 1941, he was diagnosed with abdominal cancer and was bedridden after surgery. He couldn’t paint and sculpt as he had before. A few times in earlier years, he had used collage for projects. Now, he began cutting paper that Lydia had painted bright colors into whimsical designs. Initially, they were small in scale, but soon they became mural-sized. He would direct assistants how to place the “cut-outs” in room-sized works. He used this technique to design the stained glass and interior of a small chapel in the French Riviera. He died of a heart attack in 1954. His children continued to work in the art world during their lives and the influence of his work can still be seen in modern art today!
Project:
We will make our own cut-outs like Matisse did. You can make your cut-out as simple or intricate as you’d like. Here are a few tips to make it easier:
You can plan out what you want to do with a rough sketch on a piece of scratch paper, but it isn’t mandatory.
Cut or tear the paper to give it different textures. You can fold the paper and then tear it to control where it tears more easily. You can also hold the paper with one finger, while using your other hand to pull the other side of the paper down to create a tear with a bigger edge.
Combine cuts and tears to give an interesting texture.
Arrange the pieces on the paper before gluing anything down to make sure you like the final design. When you are happy with the way it looks, glue everything in place.
After you are done hold the paper up and give it a little shake, make sure all of the pieces are secure.

may’s art movement: art nouveau

No Comments »


Art Nouveau (French for New Art) was a movement that swept throughout Europe and the United States from the early 1880s through 1915. The movement began in Britain, but was quickly taken up by other art centers as a response to the Industrial Revolution. Artists, craftsmen, architects and others consciously decided to work together to bring art into everyday aspects of life. They were unhappy with the utilitarian and mass produced lifestyle that they Industrial Revolution had sparked. With all of the mechanical advances made during this time, things could be mass-produced in factories instead of hand made by craftsmen which lead to a more homogenized and less thought out set of dishes or hairbrushes, etc.
The artists and artisans of the art nouveau movement also wanted to break down the hierarchy of arts that said fine art (such as painting and sculpture) were separate from home design and the more functional items that filled the general publics houses (often referred to as the applied arts). By embracing architecture, graphic art, interior design, and most of the decorative arts (such as jewelry, furniture, textiles, household silver and other utensils, and lighting), the founders of the movement hoped to create a world that was more beautiful to live in. According to the philosophy of the style, art should be a way of life. For many well-off Europeans, it was possible to live in an art nouveau-inspired house with art nouveau furniture, silverware, fabrics, ceramics, and jewelry, etc.
Artists took the plant forms they saw in nature and then flattened and abstracted them into elegant, organic motifs. Common elements of the period were controlled but swooping lines with rich design flourishes and stark contrasts. As the movement grew, the materials used became more lavish and the construction was highly skilled and detailed. This made many products more of a luxury and therefor not readily accessible to the general public. (However, the design motifs were also used in mass produced objects as well.) Louis Comfort Tiffany was a leader of the movement in America (often it was referred to as “Tiffany Style” in America). His intricate stain glass lamp shades are an excellent example of the art nouveau ideals.
Advertising was another interesting frontier during this time. (Railroads, and the telephone were newer innovations and made it much easier to move products and information great distances. You can imagine that life really changed around late1800s. This was the time when many things we take for granted today were being invented.) Henri de Toulouse-Lautrec’s posters advertising the Moulin Rouge (a dance show) and other venues and products are considered to be the first of the modern format for the poster or billboard.
Art nouveau works were not all uniform in style. One artist, Siegfried Bing, said “Art Nouveau, at the time of its creation, did not aspire in any way to have the honor of becoming a generic term. it was simply the name of a house opened as a rallying point for all the young and ardent artists impatient to show the modernity of their tendencies.” Yet, it is easy to see a unifying style across this movement that did bear many different names in different countries at the time. This lavish style was ultimately the downfall of the art nouveau movement. As World War I unfolded, people turned to more functional design and the sweeping nature-inspired lines of art nouveau were replaced with modern, sleekly industrial designs of Art Deco. However, the graceful nature-inspired designs continue to show up in design today and the idea of infusing everyday life with art and beauty is one we should continue to uphold.
Today we will do just that as we try to redesign everyday objects and make them more beautiful. Use one piece of paper to brainstorm ideas and make rough sketches of how you could change some of the items you use everyday. Then take one or two of those ideas and make a more refined sketch of what that item would look like.
There are colored pencils on the cart as well as some colored paper to make it more interesting, but ultimately, this is a thought activity; just be creative and have fun with it!
*If there is time, encourage the students to share their ideas.

february’s artist: dmitri prigov

No Comments »

Dmitri Alexandrovich Prigov was a poet, graphic artist, sculptor, creator of installations, performance artist, and philosopher during the tumultuous 1970s, 80s, and 90s. Prigov is one of the most famous figures of the “unofficial art” the collapse of the Soviet Union. He was born on November 5, 1940 in Moscow. His father was an engineer and his mother a pianist. After school, he spent two years working in a factory as a metalworker. As a teen in 1956, Prigov started writing poetry which was the medium he was most active in throughout his life. In 1966, he graduated as a sculptor from the Higher Industrial Art School.

From 1966–1974, he worked for the Moscow city architectural department as an inspector overseeing the painting of building and projects in municipal parks. During this time he developed an affiliation with other underground artist and poets. During Communist rule in Russia, recognized artists were very restricted in what they could produce. This time was very different from what we are used to. In the United States, people can say what they want; artists can paint whatever subject they like. During Prigov’s early career, this was not the case. The few artists that were supported by the state were told what to depict. This is part of what makes Dmitri Prigov such an interesting person. He challenged the commonly accepted beliefs and was one of the creators of the underground art movement. He was even briefly imprisoned for his work.

As an artist, Prigov was drawn to everything fragile, he liked using material like newspapers — which he considered a metaphor for human beings with a perishable body but filled with ideas and thoughts to create his art installations. (An installation is like a life size scene that uses everyday objects and that is, itself, the piece of art. For example in the pictures on the cart there is an arrangement of newspapers with the word “Glasnost” painted on them. Glasnost is the policy of more open sharing of information with the public that was instituted by the new government after the fall of the Communism. *Take a moment to talk about this picture with the older students. Consider Prigov’s use of newspaper to represent the fragility of humans and the bold way Glasnost is painted over the top. What do they think Prigov was trying to say?* This is usually what art installations (Which are a more modern art form) are usually about…making a statement and causing the viewer to think about a subject in a new way.

Dmitri Progov’s art was more about getting ideas and messages across to the viewer than being beautiful and artistic. He considered himself first a philosopher and used all of his different talents together to convey his message. For example, he would do several drawings of an idea or installation, and they would be part of the art. Then he would set up a scene from one of those drawings and often he would have someone film him reading his poetry in the scene. You can see how this creates several different pieces that are all part of the whole idea. Using so many different techniques is very impressive in itself!

Dmitri created interesting ways to record his poetry. Sometimes he cut out lines and stapled, taped, and glued them into interesting designs. He also made little books whose shapes added to part of the story or poem inside. Today we are going to do our own shaped books. While we are talking, think about a favorite story or make one up. You could also create a poem. Poems are often more threads of ideas or images than a fully formed story. (For the older grades, read Prigov’s poem below. It will be a little above what 2nd graders and bellow can really understand.) Think about your favorite things… like springtime, winter, fall or summer or an activity you like to do. Think about a shape that will help tell the story or show one of the important parts of it and cut your papers into that shape. Show the students the example and walk through the books to help them see how to do it:
1. Plan your story and design. Decide how many pages you will need.
2. Stack the pages together (up to about 4) and lightly draw the design then cut them out together. If you have more pages, you will need to cut the first batch then trace one of the papers onto the top paper of the second batch.
3. Trace the stack of papers onto the cover sheet of colored paper, giving a little extra room for an edge.
4. Write your story/poem on the pages and illustrate where desired, then staple everything together.

Unnamed Poem by Dmitri Prigov

It’s not important the recorded milk production
Cannot be compared to the real milk production
Everything that’s recorded is recorded in the heavens
And if it will come to be not in two or three days
Nevertheless it’s really important when it will
And in some high sense it’s already come true
And in some low sense everything will be forgotten
And it’s nearly been forgotten already
-Dmitri Prigov

may’s artist: berthe morisot

No Comments »

Full Biography:

Berthe Morisot was born January 14, 1841, in Bourges, France. Her father was a high-ranking government official and her grandfather was an influential Rococo painter. She and her sister Edma began painting as young girls and earned recognition despite not being allowed to attend any official art institutions (which weren’t open to women).

Berthe and Edma traveled to Paris to study and copy works by the Old Masters at the Louvre Museum as well as learn how to paint outdoor scenes. Here she exhibited in the Paris Salon in 1864 and would continue to have a regular place in the show for the next 10 years.

In 1868, fellow artist Henri Fantin-Latour introduced Berthe Morisot to Edouard Manet. The two formed a lasting friendship and greatly influenced one another’s work. She joined the Impressionist movement and eventually left the Salon to show with her friends. (Think of the Impressionists at the Indie painters of the late 1800s.)

In 1874, Berthe Morisot married Manet’s younger brother, Eugne, also a painter. The marriage provided her with social and financial stability while she continued to pursue her painting career. Able to dedicate herself wholly to her craft, Morisot participated in the Impressionist exhibitions every year except 1877, when she was pregnant with her daughter.

Berthe Morisot portrayed a wide range of subjects—from landscapes and still lifes to domestic scenes and portraits. She also experimented with numerous media, including oils, watercolors, pastels, and drawings.

After her husband died in 1892, Berthe Morisot continued to paint, although she was never commercially successful during her lifetime. She did, however, outsell several of her fellow Impressionists, including Monet, Renoir, and Sisley. Berthe Morisot contracted pneumonia and died on March 2, 1895, at age 54.

Berthe Morisot was the model of a modern woman, a century early. She held her own in a world dominated by men; all while successfully having a family just like so many women strive to do today. Manet said of her: “This woman is an exceptional painter. Too bad she isn’t a man.”

Simplified Biography:

Berthe Morisot was born January 14, 1841, in Bourges, France to a comfortable middle class family. Her grandfather was a famous painter and her family appreciated art. She and her sister Edma were given private painting lessons all growing up and were even well known artists despite the fact that women weren’t allowed to publicly show their art or attend the art schools.
Berthe joined, and was an influential artist in the Impressionist movement. She married the younger brother of a famous Impressionist painter and had a little girl. She continued to focus on her art all through her life, even though it was uncommon for a woman to be more than a hobby painter in the 1800s. She died quite young of pneumonia. This combined with the fact that she was a woman, so she didn’t have as many opportunities as an artist, means that we don’t have many of her paintings. But we can see her influence on this important movement in art.

Project:

Why do you think they called them the Impressionists? If you look at her paintings, you can see how the brushstrokes are very loose and not detailed. Impressionists painted quickly– just giving you the impression of the subject. Today we are going to experiment with this style. Monet (that we studied in December) was also an Impressionist.
Berthe Morisot was an adventurous artist. She was known for mixing media (media is what we use to make the art…paint, clay, crayons, pencil, etc.) Today we are going to do the same thing.

1. Think of your subject. Many Impressionists painted everyday scenes; such as Morisot’s laundry hung out to dry or a mother at her baby’s cradle.

2. Now quickly sketch the main details with the pastels. Don’t worry about getting too detailed…just give the impression.

3. Use the thickened or Impasto paint and the paint textured with sand to put in some broad stokes and add dimension to your piece. Use loose fast strokes. Don’t overwork the paint or you will loose the texture.

4. (Find a place to set them to dry…these will take a little longer to dry.)

april’s artist: lorenzo ghiberti

No Comments »

Full Biography:
Lorenzo di Cione Ghiberti was born in Pelago, near Florence, Italy, in 1378 (the exact month and day of his birth are unknown). He was well-trained by his father, Bartoluccio Ghiberti, a well-respected goldsmith in Florence. In 1392, he was admitted to the “Silk and Gold” Guild as an apprentice, and quickly rose to the level of master goldsmith. In 1400, he traveled to Rimini to escape the plague in Florence and received further training as a painter, working on wall frescoes at a Castle.

Ghiberti’s career would be dominated by 2 major works, 2 sets of doors for the Baptistry of Florence. Ghiberti won a contest to receive the work, submitting one panel showing the story of the sacrifice of Isaac from the bible. Originally the doors were planned to show scenes from the Old Testament, but then changed to 14 scenes from the life of Christ in framed panels. It took over 20 years to complete the doors. Each panel is strikingly detailed and are cast in 3D (remember this is in the 1400s; so no power tools or computers!)

During that time, Ghiberti also created the designs for the stained-glass windows of the Florence cathedral, and served as architectural consultant to the cathedral’s building supervisors. He also cast bronze sculptures including a larger than life sized statue of John the Baptist and bronze reliefs for another baptistry.
After completing the doors, he spent the next 10 years traveling and studying art and philosophy, he was especially inspired by Humanism. (A Renaissance cultural movement that turned away from medieval focus on the divine in favor of the Greek and Roman views of man, his struggle and thought and the goodness found in everyone.) Lorenzo Ghiberti incorporated these techniques into the baptistery’s next set of bronze doors, which are considered his greatest work. Dubbed the “Gates of Paradise” by Michelangelo, each door portrays five scenes from the Old Testament. In the individual panels, Ghiberti used a painter’s point-of-view to heighten the illusion of depth. He also extended that illusion by having the figures closer to the viewer extend outward, appearing almost fully round, with some of the heads standing completely free from the background. Figures in the background are accented with barely raised lines that appear flatter against the background, making them appear farther from the viewer.
Throughout his career, Ghiberti was actively interested in other artists’ work; his workshop was a gathering place for several prominent artists who were on the cutting edge of early Renaissance technology. Whether through collaboration, competitive rivalry or just familiarity with each other’s work, each artist influenced the other. Several apprentices working in his shop would later become well-known artists themselves.
Ghiberti was also a historian and collector of classical artifacts. In his Commentarii, a collection of three books that included his autobiography (the earliest surviving autobiography of an artist.), he expounded on the history of art as well as his theories on art and humanist ideals. After a life of building the foundation of Renaissance art and expanding its boundaries, Lorenzo Ghiberti died on December 1, 1455, at the age of 77, in Florence.
Simplified Biography:
Here is a simplified biography for lower grades. Please son’t feel you have to read either of these word for word, use the information and tailor it to what you think is best for your class.
Lorenzo Ghiberti was born in Italy, in 1378, the exact month and day of his birth are unknown because that is a really long time ago! His father was a goldsmith, who is someone who makes things out of gold. You can imagine that this was a pretty respected profession. Ghiberti was very talented and became well-known for his work. When he was in his 20s, he won a contest to make special doors for a very famous church in Italy. He made scenes out of gold from Christ’s life, then later made another set showing scenes from the bible. These were so detailed and so much work, it took about 20 years to make each set!
Ghiberti also made statues out bronze, another type of metal. A few of these were larger than life sized, like the one in the picture of John the Baptist. Imagine how much work it took to make these back in a time when there weren’t computers, power tools or even electricity to help! Look at the intricate detail.
Another thing that was special about Ghiberti was that he was very interested in other artists. He built a large studio that was a gathering place for many of the most talented artists of the early Renaissance. Many famous artists studied and developed under his care.

Project:
Today we will create foil reliefs (a raised or embossed design) that mirror Ghiberti’s work. You will want to make sure to follow the steps carefully to get the best result for your relief.
1. Draw a preliminary sketch: artists do this to prepare for a new project. It allows you to get all the details where you want them before creating the final piece. You won’t be able to erase on the foil, so get things how you want them in sketch. You will trace over your sketch to emboss the design on your foil.
2. Lay the piece of foil on a cardboard square, then lay your drawing on top. Grades 4-6 can flip the foil over to create a design with raised and lowered lines. For the younger grades, it is probably best to keep it simple and just trace the design. Use the wooden sticks on the cart, one end is pointed for fine lines (Tell the kids to be careful, if they press too hard they could tear through.) The other side can be used to make thick lines or emboss an area. *If you pick up your drawing to check the foil, make sure you carefully line it back up before you start tracing again! (We do have a few extra, but encourage kids to work with what they’ve got. If it feels like it is an emergency, you can give them a new one.)
3. After you have finished your relief, you can mount it on the card stock square provided. Apply the glue to the paper so that it doesn’t accidentally mark the foil (Don’t get too much glue!). It is a good idea to center the foil and then make a few light marks so you know where to put the glue. Then gently lay the foil on top and lightly press it down.

march’s artist: edward hopper

No Comments »


This month’s lesson is a little different in that we have an excellent picture book biography for Edward Hopper. For the younger grades, just read the book. For the older grades, if you have time, you may want to ask if there are questions or share some of the basic facts below as you talk with the students after. I will leave them in bullet form for easy reference.

*Born July 22, 1882, in Nyack, New York (a small shipbuilding community on the Hudson River.) You can see this influence in his many nautical themed works. He loved the sea.

*He was the younger of two children in an educated middle-class family. His family was supportive of his art.

*At age 5, people were noticing his natural talent.

*Hopper trained as an illustrator and devoted much of his early career to advertising and etchings. (He has been quoted on it being confining work though.)

*After moving to New York City, Hopper began to paint the commonplaces of urban life with still, anonymous figures, and compositions that evoke a sense of loneliness.

*He was able to make several trips abroad to Paris and Spain in the early 1900s. He loved the impressionists, especially Manet and Monet and Cezanne. Their work highly influenced his.

*He took the Impressionist fascination with light and used it in a much more detailed and realistic way. Critics dubbed it “soft realism”

*In 1924, he married Josephine Nivison, who was also a painter and the two worked side-by-side for the rest of their lives. She was almost always the model in his pictures and was often called his muse.

“Great art is the outward expression of an inner life in the artist, and this inner life will result in his personal vision of the world.” -Edward Hopper

Talk to the students about this quote and what they think it means. Ask them to look at his work and notice the clean lines, dramatic light, and emotional quality of the work. Point out that he was trying to help us see the world as he saw it. Encourage the students to take time and do the same thing on their canvases.

(**For younger grades I would hold up one or two of the paintings and say “Look at how crisp the lines are. There isn’t a lot of stuff in this painting. Why do you think Edward Hopper did that? What kind of feeling does this give you?” Maybe pare it down even more for k-first.)

This month, the students get to paint a canvas board. There is only 1 per student. They can pain over any mistakes, but can’t start again. Walk them through these steps:

1. Think of a place you like or a place that has a strong emotion tied to it. (Show Rooms by the Sea. Encourage the kids to paint something from life that they know well. Tell them that real artists don’t tend to paint a pretty landscape with flowers and a sun in the corner.)

2. Very lightly sketch where you want the details on your board. Only put in the broadest details! Do not draw a lot and try to draw very lightly because the pencil lead tends to smear in the paint.

3. Now start with the background, put in the sky and surrounding ground.

4. Work from the back to the front of your painting. (ie. If you are making a person, paint in the face, then the hair, then go back in and add facial features after the skin tone has had a bit of time to dry. For a landscape, put in the sky, the grass and then go back in and put the trees or the swingset. Etc.)

5. Don’t forget to put your name on the back (and sign the front if desired).

Tell the students that these canvas boards are used by real artists and hopefully are something they will take home and hang in their houses. They can be framed easily in an 8×10 frame (just remove the glass so it can breath.)

Thanks again for all you do! Let me know if you need anything!

february’s artist: faith ringgold

No Comments »

Faith Ringgold was born Faith Willi Jones in 1930 in the Harlem area of Manhattan. Her mother, a fashion designer and seamstress, encouraged Faith’s creative pursuits from a young age. Ringgold earned a bachelor’s degree from the City University of New York in 1955. She then taught art in New York City public schools and worked on a master’s degree at City College, which she completed in 1959.

Ringgold’s oil paintings and posters, begun in the mid-to-late 1960s, carried strong political messages in support of the civil-rights movement. She was an avid fighter for the right for black artists to show their work in New York’s museums and co-founded Where We At, a group for African-American female artists, in 1971.

  faithringgold_fullsize_story1

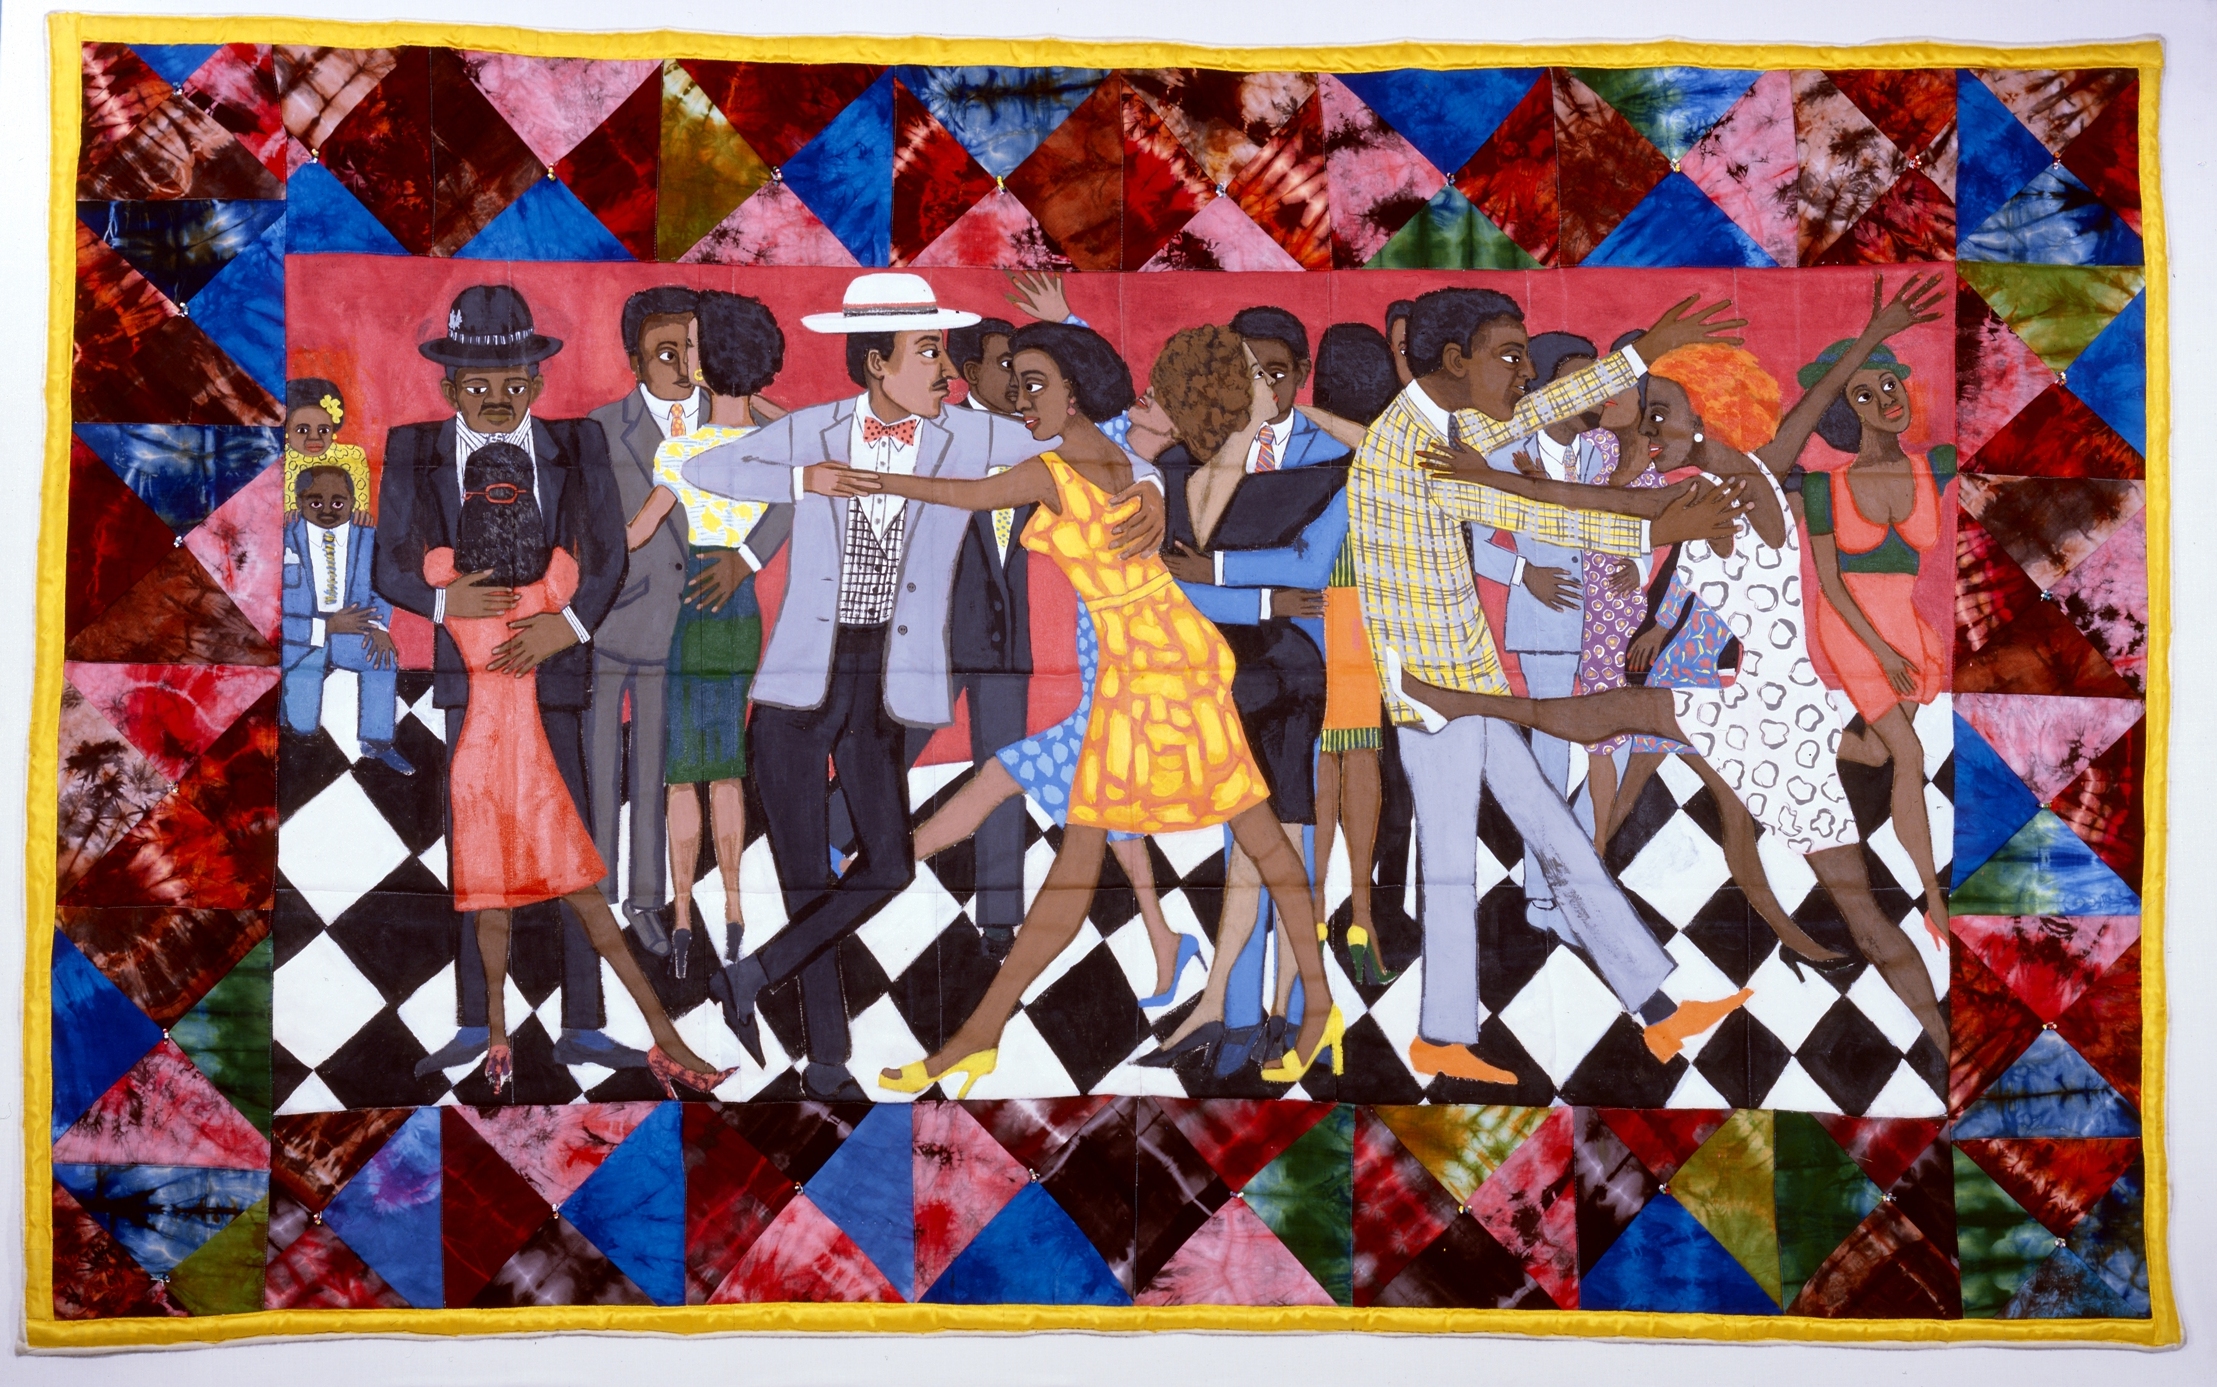
In 1973 she quit teaching in New York City public schools to devote more time to her art. In the early 1970s she abandoned traditional painting. Instead, Ringgold began making unstretched acrylic paintings on canvas with lush fabric borders like those of Tibetan thangkas. She worked with her mother, Willi Posey, to fashion elaborate hooded masks of fabric, beads, and raffia, which were inspired by African tribal costume. She also began making fabric “dolls” and larger stuffed figures, many of which resembled real individuals. Ringgold used some of these works in Performance pieces—the earliest of which, Wake and Resurrection of the Bicentennial Negro, was first performed in 1976 by students using her masks, life-size figures, and thangkas, along with voice, music, and dance.

tumblr_mba580i9j91qb1i2wo1_1280

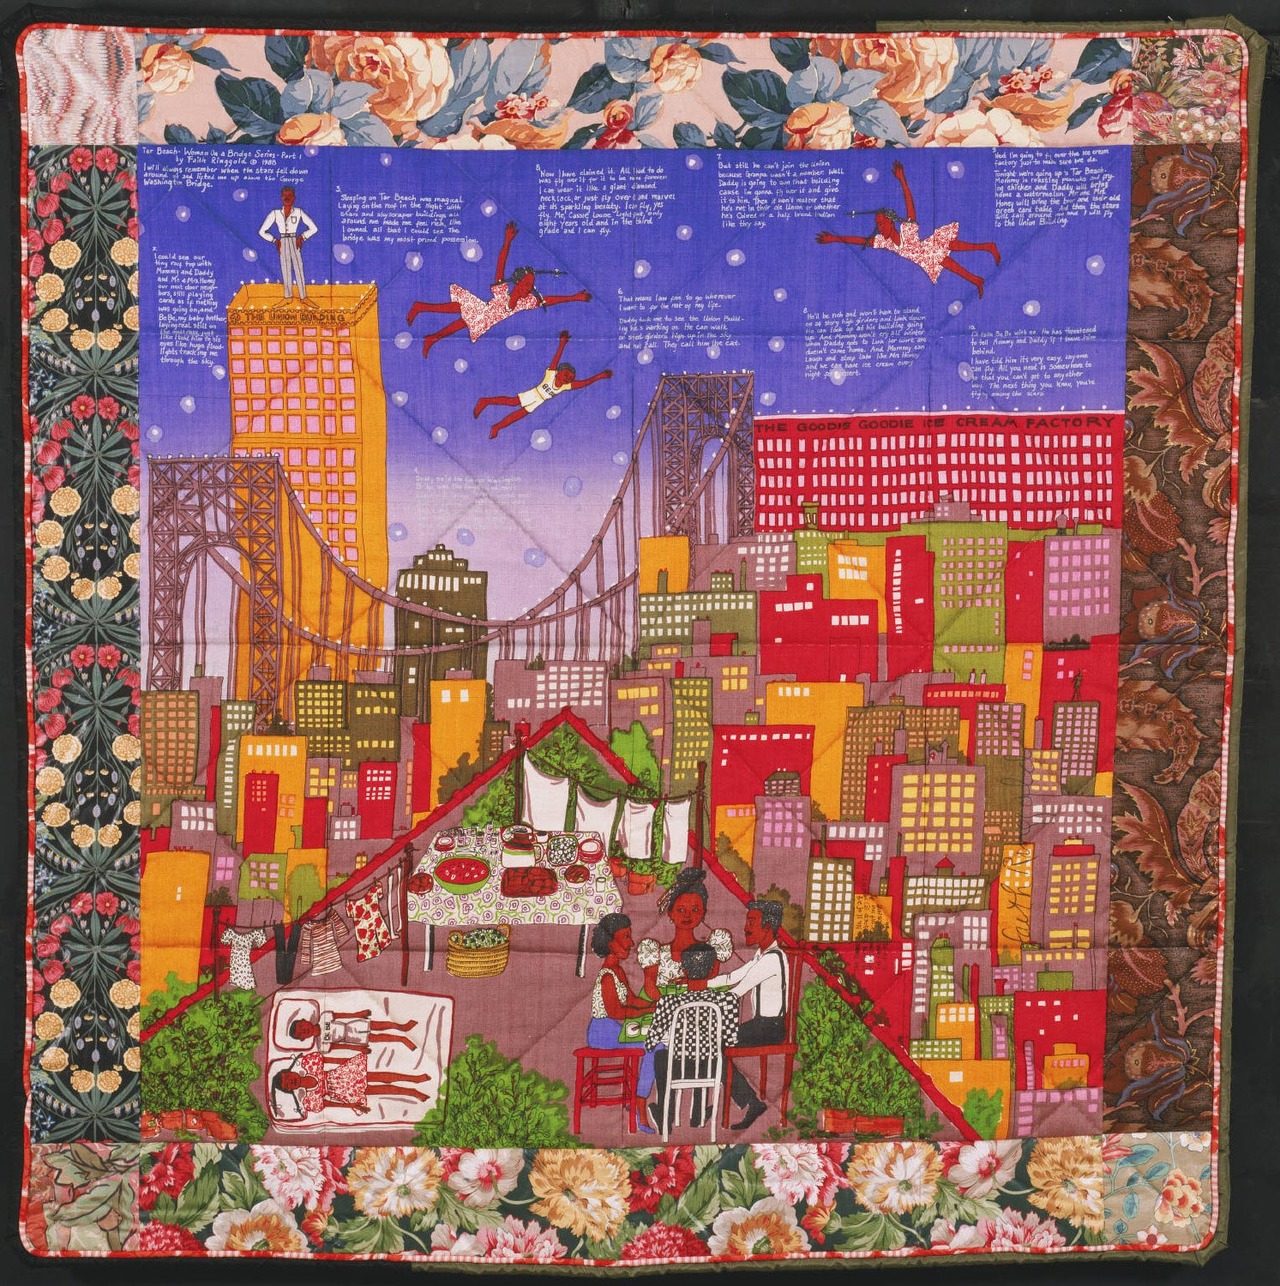
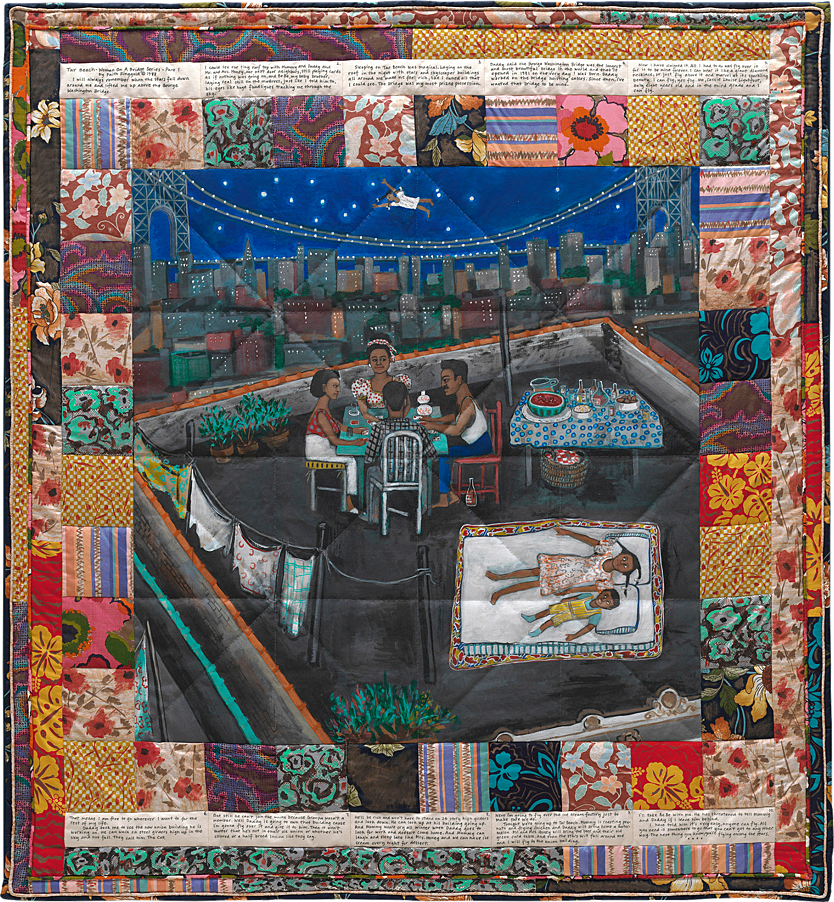
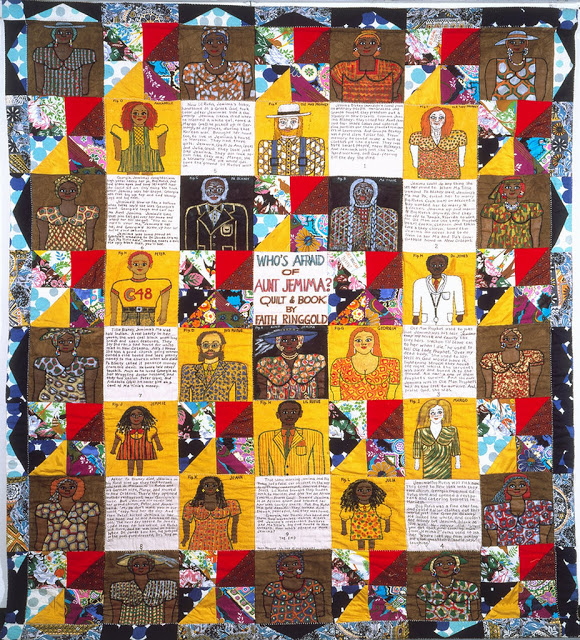
Later, she expanded the format of her thangka paintings to quilt size. Her mother pieced and quilted the first of these new works, Echoes of Harlem (1980), before dying in 1981. It was in 1983 that Ringgold began to combine image and handwritten text in her painted “story quilts,” which convey imaginative, open-ended narratives; in the first one, Who’s Afraid of Aunt Jemima? (1983), the familiar advertising character is turned into a savvy businesswoman. Ringgold’s use of craft techniques ignored the traditional distinction between fine art and craft, while demonstrating the importance of family, roots, and artistic collaboration.

From 1984 to 2002, Ringgold was a professor at the University of California, San Diego. During this time, she adapted the story quilt Tar Beach into a picture book. The success of Tar Beach led to several other books. Her talent in many different media allowed her to be a powerful voice during the civil rights movement. Today, she continues to paint, quilt, sculpt and publish in her homes in California and New Jersey. Her work now often celebrates black heroes from history.

*Take a look through Faith Ringgold’s book and if you have time, read one or two, they are fantastic!

Faith_Ringgold_Groovin_High

One of the most impressive thing about Ringgold’s work is that she adapted something that many of us have in our homes ( a utilitarian object) to create art. However, story quilts have been sewn for hundreds of years, with varying amounts of detail and consideration. This brings up the question of the difference between craft and art. Take a minute to discuss the 3 main levels of people who create, Artists, Artisans, and Craftsmen. It is said that “A craftsman works with his hands, an artisan works with his head and his hands, and an artist works with his heart, his head and his hands.” Ask the students what they think that means. What is the difference between the three categories? Honestly, it is a blurry and hard to define line. However, we can generally agree with this statement:

“Artists are there to provoke you to think or feel in any way shape or form. If your reaction is positive or negative it makes no difference. The object is to get a reaction from the beholder.

Artisans are masters of their craft and able to design pleasing objects that the public would love to posses.

The Craftsman has mastered his craft and can fabricate the artists or artisans vision.”

Today we will make our own story quilts. For the sake of time, you will want to keep your story or image fairly simple. Maybe a really great day or a special memory; or possibly a scene from one of your favorite stories. Use the fabric scraps to create blocks of color and add detail with crayon. Cut pieces of fabric from the strips in the bin. Put your scraps back in the bin for others to use. Add in text to help convey the story if desired; try to find unusual locations for the text! There aren’t any rules, just have fun!

88.3620_ph_web

 Whose Afraid of Aunt Jemima

december’s artist: claude monet

No Comments »


Oscar-Claude Monet is widely considered the driving force behind the Impressionist movement. His paintings are still beloved and highly reproduced today. He was born on November 14, 1840 in Paris, France into a middle class family. His mother was a singer. His father wanted Claude to join him in the family grocery business, but Monet wanted to become an artist. He enrolled in art school at age 11 and was well known in Le Havre (in Normandy, where the family settled later) for his charcoal caricatures which he sold at the beach.

His 1872 painting, “Impression Sunrise” (which depicted sunlight dancing and shimmering on water), gave the name to the entire Impressionist movement. A critic coined the term in a harsh review of the painting, but theImpressionist painters took it up, refusing to be subject to the established art community. They stopped submitting their work to the Paris Salon (the only place for artists to show their art at the time) and created their own galleries after being rejected. They refused to let the critics deter them. And interestingly, these artists have continued to be popular over one hundred years later. (Consider that most people know who Monet and Degas are, but not many (average, non-art loving) people can tell you who Constable and Turner are.)

Monet felt that “…nature knows no black or white and nature knows no line” which led to beautifully colorful and energetic pieces of work. He began to think in terms of colors and shapes rather than scenes and objects.Impressionists strived to capture the many colors reflected in light, meticulously representing the colors seen in highlights and shadows. They used quick distinct brush strokes that give the painting a feel for a fleeting moment captured on canvas; rather than well blended, invisible strokes.

Monet painted several groups of landscapes and seascapes in what he considered to be campaigns to document the French countryside. These began to evolve into series of pictures in which he showed the same scene many times in order to capture the changing of light and the passing of the seasons. He was said to take several canvases out with him on a plein air (or outdoor) painting session and work quickly on one canvas until the light changes, then move to the next canvas to get the specific quality of light at different times of day.

At the beginning of May 1883, Monet and his large family rented, then bought a house and 2 acres on which he planted elaborate gardens. Here he painted and lived out the rest of his life. Creating many of his most famous series, such as his waterlilies. Monet died of lung cancer on 5 December 1926 at the age of 86

Today we will try out the impressionist style by painting a landscape. Think of one of your favorite places. Quickly sketch in the very biggest features in a basic way. No details! Here are a few tips that will help you out as you start to paint:

  • Keep in mind the name of this movement! We are just giving an impression of a scene here. Don’t get too caught up in the details. Try squinting your eyes and looking around at different objects in the classroom; see how this blurs the details. Try to make your landscape similar. (Rather than individual leaves or flowers, you would use dabs of paint.)
  • Apply the paint somewhat thickly (impasto), use bold strokes and don’t blend the colors completely.
  • Use complementary colors (across from each other on the color wheel) to show the shadows and highlights.
  • Mix color right on the canvas/board. Let them remain a bit separate, work quickly and loosely.

1. Start with a very loose watery wash from the bottom to the top of the sky. Add a bit more blue at the top so that the sky is lighter towards the horizon.

2. Now start to add in details in the background of the landscape, add a little more color to your brush to create a thicker mix than the sky. Use short strokes to apply the paint slightly more impasto (thicker) than the initial wash in we used for the sky.

These dabs of color help to move the viewers eye around the painting. Keep in mind the tips from above. Don’t get too caught up in the details….we are just giving an impression.


november’s artist: andy warhol

4 Comments »

Andy Warhol (originally Andrew Warhola, Jr.) was born on August 6, 1928 in Pittsburgh, Pennsylvania. His parents came from a village in the Carpathian Mountains, in what is now Slovakia. Warhol’s father was a coal miner who died of peritonitis when Andy was thirteen. In third grade, Warhol had Sydenham’s chorea (a nervous system disease that causes involuntary movements of the extremities..) He became a hypochondriac, developing a fear of hospitals and doctors. Often bedridden as a child, he became an outcast at school and bonded with his mother. At times when he was confined to bed, he drew, listened to the radio and collected pictures of movie stars around his bed. Warhol later described this period as very important in the development of his personality and style.

At the beginning of his career in the 1950s, Warhol gained fame for his whimsical ink drawings for shoe advertisements. He also illustrated many record covers for RCA. As me moved from commercial illustration to fine art, Warhol began using a silk screen printmaking process to make his paintings. Initially, he used hand-drawn images but later evolved into a process of silkscreening photographs on the canvas, then painting over the top. He liked to create a series of one image with different variations. From his illustrations to his fine art, Warhol had a very casual and loose style, he embraced mistakes, saying “When you do something exactly wrong, you always turn up something.”

His most famous works centered around easily recognizable, everyday subjects. (This is a key aspect of Pop art, which challenged the traditions of fine art by including images from popular culture such as advertising, celebrities and news.) For his first first major exhibition Warhol painted cans of Campbell’s Soup, which he said he had for lunch for most of his life. Andy was always coy with how he felt about his art and it’s meaning. Of his coke cans and bottles he said:

“What’s great about this country is that America started the tradition where the richest consumers buy essentially the same things as the poorest. You can be watching TV and see Coca-Cola, and you know that the President drinks Coca-Cola, Liz Taylor drinks Coca-Cola, and just think, you can drink Coca-Cola, too. A Coke is a Coke and no amount of money can get you a better Coke than the one the bum on the corner is drinking. All the Cokes are the same and all the Cokes are good. Liz Taylor knows it, the President knows it, the bum knows it, and you know it.”

Critics were scandalized by Warhol’s open embrace of market culture. His work was controversial because it was so openly driven by consumerism. Especially later in his career, he was heavily criticized for becoming merely a “business artist” He said “Making money is art, and working is art and good business is the best art” Warhol’s art used many types of media, including hand drawing, painting, printmaking, photography, silk screening, sculpture, film, and music. He was also a pioneer in computer-generated art. He lived a crazy and glamorous life, surrounded in his studio by artists, actors, and celebrities that jockeyed for his attention.

In 1968, Warhol was shot by a fan with mental disease and almost died, afterward his life and work became much quieter and less public. Warhol devoted much of his time to rounding up new, rich patrons for portrait commissions. His health never improved significantly and on February 22, 1987, he died from complications from a surgery. He left his considerable wealth to the Andy Warhol Foundation for the Visual Arts with the goal of supporting work of a challenging and often experimental nature. He also has the largest museum devoted to one artist in the US in his hometown of Pittsburgh.

What do you think? Is his art genius or empty? Did he paint because he thought it was great or because he thought it was junk? Is his work a commentary on the shallowness, repetitiveness, and commercialism of consumer culture, or is it a celebration of supermarkets and Hollywood?


Today we are going to experiment with some Warhol-style art. We have several copies of poplar images or draw a set of your own. Then experiment with different styles and techniques to create variations on the image. You can use different colors or manipulate the image to change it. Have fun and don’t worry about mistakes, Andy didn’t!

After you have made 6 variations on your image you can mount them (with glue stick) to a sheet of colored paper to create your final piece. You can use crayons, colored pencils or markers to give each image a different feel. Also feel free to cut and put the image back together.

« go backkeep looking »